30 October 2009

Crochet Flower Earrings


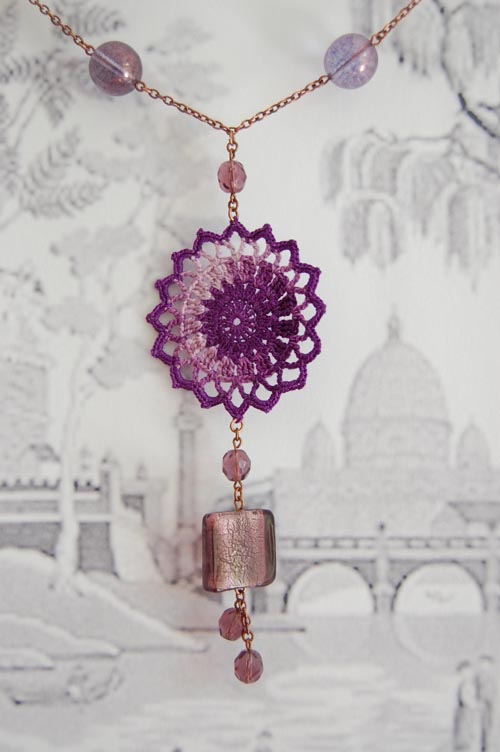
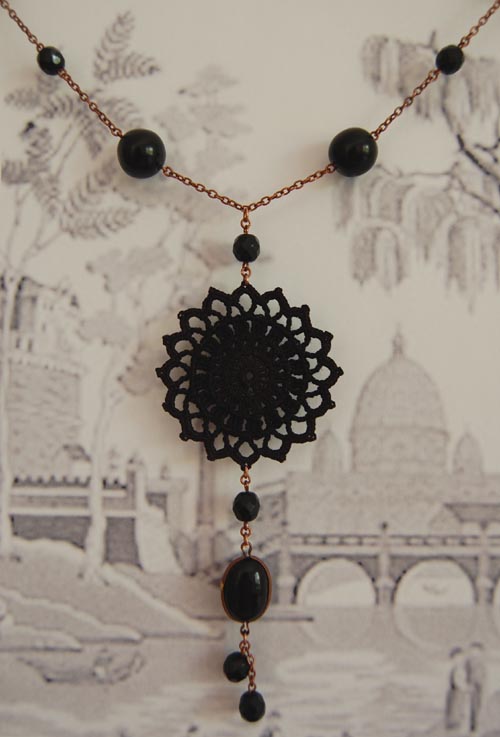
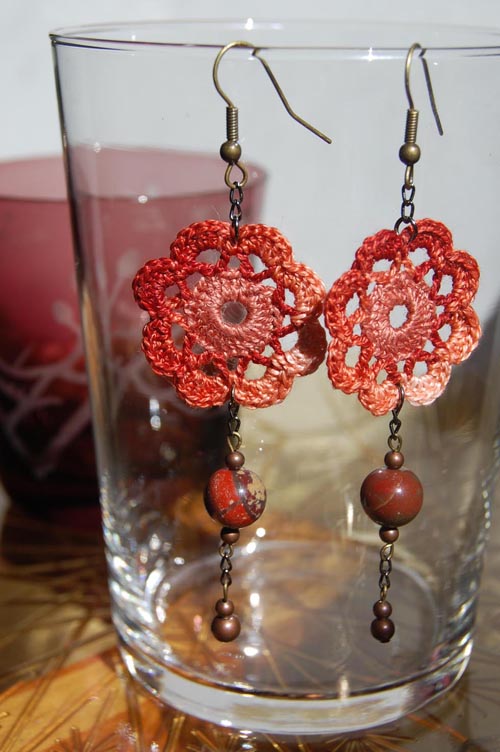
Here is the crochet and beading patterns for the 'flower earrings'.
They're very straight forward to make and I've posted both the written and drawn pattern.

To make the Crochet Flower

Materials
Cotton thread. I use DMC (in varying colours) but I'm not sure what thickness? like these.
1mm hook

Pattern
Ch6, join to make circle.
Round 1: Ch 2 (first hdc), 23hdc around in circle, join to first hdc.
Round 2: Ch2 (first hdc), {skip 2hdc & hdc in 3rd hdc from hook, ch4. hdc in same hdc} Repeat 6 more times. Skip 2 hdc & hdc in 3rd hdc from hook, ch4. Join to top of first hdc.
Round 3: {6hdc in ch 4, sc between two hdc} repeat 7 more times. Join and sew in end to finish.


To make Flower Earrings

Materials
  • Two ear hook
  • 6 lengths of 2x3mm chain, each 2 links long.
  • 2 x Crochet Flowers
  • 4 wire rings (to join chain to crochet flower)
  • 2 x head pins + extra for connecting beads
  • 2 x feature beads
  • 6 x small metal beads
  • 2 x large metal beads
Connect all as described in the diagram below.


I hope you enjoy

Note: I've amended this pattern (2nd November) to American crochet speak rather than my own strange crochet language which was my translation for the Spanish.
It should be much easier now, but please let me know if there are still problems : )

Creative Commons License

27 October 2009

lighting with crochet


Over the last couple of days I've been working on a lighting plan, so doing lots of Googling and finding lots of cool images of new lighting designs. I've also discovered there's quite a few designers making light shades out of stiffened crochet, which seems to be very in right now.

The three images above are my favorites. The first shows the Nordic Light Pendent by Pickles and is made by crocheting over a Chinese rice paper light shade. Click here for the pattern, so good! The second is a crochet orb by Resurrection Fern which is such a gorgeous outdoor light and casts such lovely shadows. She has also published a free pattern here. The third image is the Afra Table Lamp, which looks like a frosted glass light wearing a beenie, very cute!

26 October 2009

a new colour


Last week I got to the end of my dark purple wool with only three pieces to go and El Gato Negro where I buy my wool has run out, so I have to wait for more. Fingers crossed they'll get some more in soon of the same (or close to).
In the mean time I have started with two new dusty shades of blue. So far I have only made one, so 35 to go until the next new colour.

21 October 2009

Inspiration


I have recently found this group online called Casamento from Capetown in South Africa. They showcase beautiful individually handcrafted furniture, which is made using natural fibres and traditional techniques.
Their web page is full of beautiful images of their products but a little bit limited in terms of information. I have been going around in circles trying to find out more about them and the artists they present. In particular Laura Sums (photographed above, centre) who is a crochet artist involved in a project called The Yabonga HIV Project . As part of the HIV/Aids training programme she teachers women to crochet and create her designs giving them a home based career. I love the idea of this, being involved in a group working together on crochet projects. So much fun!

19 October 2009

Caramel


Here are some new earrings I finished late last week. The top image shows a new design 'Queen of Spades', this if the first (and so far) only pair.
I have uploaded these to my Etsy shop today.

15 October 2009

New Designs


This is a new design I have just completed. I used the grey crochet motif I made the other day with a moon stone (from India) sewn in the centre. It has four tiny antique silver chains spotted with silver and grey/silver acrylic beads that sits around the base of the neck, fastened at the back with an antique silver clasp. From the base of the motif hang ten antique silver beads strung on feathered metal hooks.

14 October 2009

Sun Necklace Pattern


Here is the pattern (crochet and beading) for the Sun Necklace above. It's quite simple but to make sure it's explained clearly I've put both photos, drawings and a written explanation. If something doesn't make sense let me know.

Below is a photo and list of what you'll need.


  • 8 lengths of 2x3mm chain, each 10 links long (silver, copper etc this is brass).
  • 1 length of 2x3mm chain, 23 links long.
  • 1 length of 2x3mm chain, 4 links long.
  • 4 x 1.3cm diameter beads
  • 8 x 0.8cm diameter beads
  • 1 x feature bead
  • Clasp
  • Headpins for rings and to go through and join beads.
  • Crochet Motif

    Note: I usually by my beads at the local bead shop as I like to see their exact size colour etc but the chain and head pins I buy through Etsy. I often find it's cheaper that way, even to post it all the way from the US to Spain.


To make the Crochet Motif

Materials
Colour 1. I use Anchor pearl cotton #12 which is finer than colour 2.
Colour 2. I use DMC cotton thread, I'm not sure what thickness? like these.
1mm hook.

(Using colour 1) ch 8, join to make a ring.
Round 1. 16dc in a circle, join.
Round 2. I'm not sure of the name of this stitch, it's like a popcorn but looks more like a petal. I'm going to describe it step by step.
chain 3 (first dc). dc in the same dc (without pulling through the last 2 loops on the hook). dc again in the same dc. ch1 (completes petal). Ch1. {dc in next dc (without pulling through the last two loops on the hook). dc again in the same dc (without pulling through the last two loops on the hook). dc again in the same dc. ch 1 (to complete petal). ch1} Repeat between {} 14 more times. Join with slip stitch, cut thread and sew in ends.
Round 3. Tie colour 2 onto ch1 space. ch3 (first dc). 2dc in same space. ch 1. {3dc in next ch1 space. ch1} Repeat between {} 14 more times. join with slip stitch.
Round 4. (Starting in ch1) ch3 (first dc). dc in next ch1. ch4 {dc in same ch1 space. dc in next ch1 space. ch4} Repeat between {} 14 more times. Join with slip stitch. Cut thread and sew in ends.
Round 5. Tie colour 1 onto space between dc, ch1 (first sc). {4sc, ch3, 4sc in next 4ch space. sc in next space (between 2dc)} Repeat between {} 15 more times. Cut and sew in ends of thread.

To give the motif some added stiffness I use a sewing needle and run some thread around to make two circles (under the crochet on the back side). Pulling the thread to the right tension and then sewing in the ends.

Below is a diagram showing what I've just described.


Now to put it all together follow the diagram and photo below.


enjoy!

I would love to see any photos : )


Note: I've amended this pattern (8th of November) to American crochet speak rather than my own strange crochet language which was my translation from the Spanish.
It should be ok now, but please let me know if there are any problems : )

Creative Commons License

09 October 2009

flowers for friday


Today I uploaded these little flowers to my etsy shop. Click here to have a look.

08 October 2009

Black Sun


Today I finished this Sun Necklace in black and copper and also some flower earrings. I'm going to wait until the morning to upload them to my online shop so as I can get some good photographs with the morning light.

I will also be uploading the crochet pattern for this motif and some beading instructions shorty : )

07 October 2009

Crochet Motif

Today I crocheted this motif using one of the muestras de crochet as a guide. I'm going to use it as part of a silver necklace design.
If you'd like to make one I have written (and drawn) the pattern below.
Materials
I use DMC cotton thread, I'm not sure what thickness? like these.
1mm hook.

Center square
ch 16.
Row 1: ch 3 (first dc). ch 2. dc in 9th ch from hook. {ch2. skip 2 chains & dc in 3rd ch} repeat 3 more times. turn
Row 2: ch 3 (first dc). {ch 2. dc in next dc} repeat 4 more times. turn
Row 3, 4 & 5: repeat row 2.
Join, cut and sew in thread

Middle Layer
Join thread to middle of second ch2 from the corner of the center square (refer to drawing).
Row 1: ch 6. join to forth ch2 from the same corner. turn
Row 2: 3hsc then {ch3,3hsc} repeat 2 more times (in ch6).
Join, cut and sew in thread.

Repeat this on the other three sides of the square.

Outer Layer
Join thread to corner of Center Square (refer to Drawing).
Row 1: {ch 7. Join to first ch3 of Middle Layer. Ch 7. Join to second ch3 of Middle Layer. ch 7. Join to next corner of Center Square} repeat 3 more times. Join
Row 2: {(3hsc, ch3, 3hsc, ch3, 3hsc) in chain 7. (5hsc, ch 3, 5 hsc) in second ch7. (3hsc, ch3, 3hsc, ch3, 3hsc) in third chain 7} repeat 3 more times.
Join, cut and sew in thread.

I hope this makes sense : )

This Pattern was amended 27 November 2009. See Here

05 October 2009

Crochet Samples


These samples are part of the same huge collection of Muestras de Ganchillo by Carmen Matias Rodriguez . Mari Carmen found these ones last week hidden away in the top of the cupboard. It's amazing how many and how detailed they are!
I think the sample second from the top could be a great pattern for a cuff, maybe around the wrist of some long woolly winter gloves.

01 October 2009

Collar


I received an exquisitely wrapped package the other day all the way from Fremantle (Australia) and inside was this beautiful BENCKE collar. It's such a great design and so perfectly created. I can't wait to wear it. Thanks Gil!

you might also like ...

Related Posts with Thumbnails